So I realize I have failed as a blogger over the past two weeks. I let things get away from me and have seriously neglected my vast audience of readers. In the past two weeks I have been crafting and been busy though I promise. For instance, last weekend, we traveled up to Columbia, SC for the USC vs Kentucky basketball game. Let me just say, “GO BIG BLUE!” It was quite a game. But lets get back to business.
The barn door is in! It slides and works. We love it. After sealing the side I stripped the paint off of, I painted the other side trim white. That way from the outside it looks fairly normal.
Outside of room.
Inside door surface.
The track itself went in fairly easily. All of the bolts found their way into a stud except the far right one. I had to replace it with the world’s largest toggle bolt and then paint the head to look black like the rest of the hardware.
We love it and would not have it any other way. We simply do not miss the old builder’s grade double doors that were falling apart.
I promise I will be posting more often. I have jewelry updates, more craft room photos to share, and many posts about things to come. There will be a week in March when we will be in Mexico for a trip, but we will have posts about that when we get back home too. Until then, keep an eye out for more posts on a more regular basis!
I intentionally chose something less complicated than a skirt because… 1) It’s Wednesday and 2) It’s February. I’m not sure if other teachers share this feeling, but February has always been a bit of a doozy for me. In January, I’m still somewhat rested from having 1-2 weeks off, and March brings the promise of spring break. February, though, just has some bad weather. And Valentine’s Day. It’s only the third… oy.
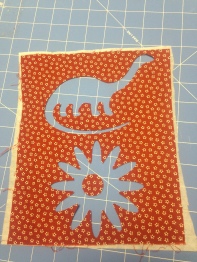
Anyway, this is the test of a new blade for our Silhouette Cameo- one for fabric! I obviously decided to cut out a brontosaurus. The flower is just to take a little more advantage of the space.
Interface is a go
1) If you want to use the Cameo to cut out fabric, it needs interfacing. Silhouette makes its own, but I used leftovers from an old project without any trouble.
2) Make sure you have the adhesive side of the interfacing touching the wrong side of the fabric, and iron the smooth side of the interfacing (glue dots facing the board).
3) Attach the fabric and interfacing to the cutting mat.
4) Make sure you have swapped out the normal blade for the blue fabric one, and line up the mat.
5) Use the fancy cameo program to choose a design. I would go into more detail here, but Max did it for me tonight.
6) Watch it go! It’s more fun than it sounds.
What’s left after the shapes were taken out
Look at them! Aren’t they precious? Now I just have to go find something to put them on…
My latest ongoing home improvement project is replacing the builders grade double doors into the master bedroom with a sliding barn door type setup. The original doors were maddening. They were falling apart, and took up too much floor space when open. They also stuck some when closed which made opening them a loud procedure.
This is the hardware I chose from Amazon. It is affordable and has free shipping, which is great when you think about how much it likely weighs. It will work well with the 36″ opening I am working with.
This post is mainly though about preparing the door itself, and there will be a separate entry about installation. I had a few old heart pine Charleston doors in the garage. I picked one out, and this is to be my sliding door.
Door before any work done next to Pie Safe in bedroom.
I love chippy old lead based paint. The issue is, I already have a focal point piece in the master that has it- my old pie safe. It is one of my most favorite pieces of furniture. I picked it up at a country auction a few years back, and it is gorgeous. The door, though also beautiful, has green and pink chippy paint and it was too much of the look so close together. So the decision to strip it was made.
The stripper I used was Klean Strip Premium Stripper. Folks, this is an outdoor project. One must wear thick chemical gloves, a mask, and eye protection as this will likely burn your skin. The good news is, it works. You slather it on the door, wait 15 minutes, and scrape with a plastic scraper. I had to do this 4 or 5 times, as the door had so many coats of old paint on it. It had Green-> Pink-> Yellow-> Turquoise and finally the wood was underneath.
This is what it looks like as the paint starts bubbling up with the chemical stripper on top.
Here is the progression from coat one to five. The final picture is how I have left it. I didn’t want to take away all of the paint. The step after stripping is to wipe it all down with mineral spirits to remove any traces of the chemical. I also then wiped down the door with tung oil (my favorite reclaimed wood finish).
The wood underneath is beautiful. I can’t wait to show you all how it looks on its track and being used. I have to modify the door frame some, and then paint the other side of the door. I am painting it a solid semi gloss white to match the trim in the house, so that from outside the room, it does’t look out of place. It will be nice once it is all complete, so we can have a bedroom door again rather than the old curtain we are currently using. The Wifey will certainly appreciate it. Thats all for now– Look out for part two of this project!
So last night, I had papers to grade. A lot of them. I also was dropping rank in my Fitbit ‘Workweek Hustle’ challenge, and needed to actually exercise.
So what did I do?
Make a skirt, of course!
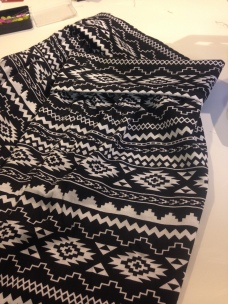
This is fabric I got on sale at Hobby Lobby— I love when the ‘end of rolls’ section actually has cute patterns! It is technically a knit, but I feel like it just barely qualifies. It stretches slightly, like jersey, but holds shape more like normal cotton.
I started off using the waist band tutorial from Make It & Love It. My plan (before I read the entirety), was just to follow the directions in general. I was already proud of myself for not using a straight up pattern- it was a first, and I was definitely was more willing to take risks in my new space!
However, the problem with using sewing as a procrastination tool, is that you don’t always have all of the materials needed. In this case, the tutorial called for a circle skirt. These are cute, but need a much larger piece of fabric than I had. What to do?
I started off creating the waistband as directed- reading ahead was never my strong suit.
Thanks for my birthday present Max!
First of all, how tall do you want the band to be? I wanted mine to be about 3 inches. Since you will end up doubling it up AND folding it over, multiply that by four. Add an inch for seam allowance, and that gets you the height for your waistband. For example, mine was 13 inches. In order to make sure that your waistband fits snugly, subtract two inches from your actual waist measurement for the width.
I used my amazing new roller-cutter-thingy. How did I not have one of these before?!
Now, sew the two edges with the right sides facing each other. This should form a tube of fabric. Use a zigzag stitch to allow for stretching.
After I finished with the waistband, I was left with a good bit of fabric, but not quite enough to actually follow directions. Measuring it out, I had a 58” x 19” bit of fabric. I set my machine to the loosest straight stitch possible, and sewed a quick line down the length of the fabric with 1/2” seam allowance.
Without doing anything else, this brought my 58” down to 43”. I then just held onto the top thread and ‘slid’ the fabric down until it was actually the size of my waist. I then sewed the two sides together to make a skirt shape.
From here, I picked back up at the lovely lady Ashley at Make It & Love It. Fold the waistband onto itself, wrong sides together. Place 8 pins equidistant from each other along the bottom, pinning the open ends together. Do the same thing along the top of the skirt piece.
Then, line up the pins. There will be extra skirt fabric between the pins (Remember, the waist band was supposed to be -2 inches from the waist). You’ll end up having to put the skirt inside the waistband. while doing all of this.
Then, flip it so that the waistband is on the inside, and the skirt is on the outside.
Sewn together, before folding the waistband down
Sew the tops together, using the zigzag stitch again (1/2 inch seam). After doing this once, I used a seam ripper to get rid of my earlier ‘loose stitch.’ I then added an additional zigzag stitch around the top.
Cut away extra fabric around the top, and iron flat.
Now, if you used ‘real’ knit, you wouldn’t necessarily need to hem, as knit doesn’t fray. However, I felt mine needed it.
Did anyone else use to avoid ironing before sewing the hem? Because I did. “Oh, that isn’t actually necessary…” “That’s just an extra step…”
Yeah. That was wrong. Iron before you hem. It’s so much easier, plus better looking.
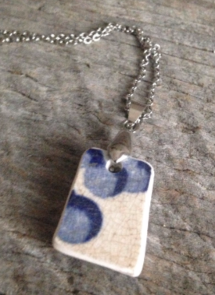
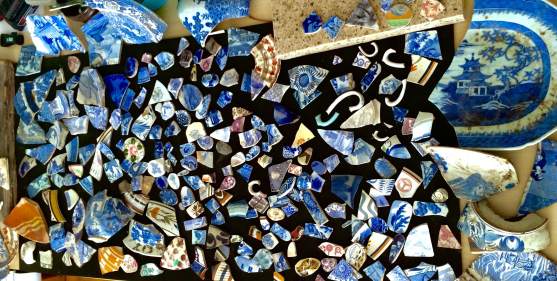
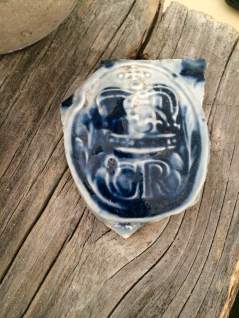
In my business, I use china. All of the china I craft with comes from Historic Downtown Charleston, SC. The picture above is but a sample of what I have at my disposal. I would guess its 1% of my total stockpile. Now when I say it comes from Charleston, I mean thats where I find it. More specifically, I dig it out of the ground. I go under houses and in their yards to find my pieces of history.
In the times before curbside pickup, people really only had one option for their household garbage and debris. That option? The Yard. They would have pits where they would dump their trash. A nice word for the area of dumping is called a “Midden.” This is where I find the china. What are some other things I have found in various middens? I have found bottles, buttons, coins, doll parts, animal bones, oyster shells, tools, silverware, and even once a Megalodon tooth! It is amazing what is just under the surface. The other thing that blows my mind is the immense variety of patterned china that surfaces. So many seemingly unique styles.
China is my prize. Almost all of it is 19th Century. I have even found some from the 18th Century: All just in the dirt.
The reason I have all the china out in the first picture is because it is about time to ramp up production again. I go through periods where I need to replenish finished products and now is that time. I will be making necklaces, bracelets, rings, cufflinks, hairpins etc. all over the next week or two. I can’t wait to show you all the completed projects. Thanks for reading!
Just received my new Silhouette Cameo! It is one heck of a machine. I have only tinkered a bit with it so far but I can’t wait to get cracking with it. I will be able to do so many new projects. I bought it through Amazon.com and it came with many bonuses. It came with the vinyl starter kit and a whole mess of tool accessories.
First Cutout
As you can tell, I need to practice. I was a bit off center when I was playing around, but I am amazed at how precise the Cameo is. I read that with the deep cutting blade, I can cut leather. I have 50 pounds or so of upholstery leather samples. Should keep me busy. The tool review will come at a later date as I haven’t done much of anything with this machine yet.
Thanks for reading and sorry for the brevity! Till next time-
I’m here to kick off my weekly Wednesday post. I’ll do my best to hold my own, although Max is really the ‘man with the plan.’ In my real life, I teach fourth grade- and absolutely adore it. It doesn’t hurt that my commute comes with views like this:
Teaching on the island has its perks!
I’m going to write up the first installment about our one-room renovation of the room above our garage, or ‘FROG.’ While it was quite an adventure- including flooring, yards of shelving, and possibly the largest craft table known to mankind- I would like to talk to you about my happy spot, my sewing station.
There are several things that I love about this spot. It is large enough to really spread out. Also, it has some personality. I’d love to be someone who could sit down and focus no matter where I was, but that just isn’t the case. Even with larger sewing projects, I have more than enough space. Finally, I have storage coming out of my ears!
We were really able to take advantage of the space by opting to create a desk rather than buying one. The base of my workstation is two IKEA Kallax shelving units on their sides- one a 2×2, the other 4×2. Laying across them is an IKEA tabletop- so not only is there a lot of workspace, but it’s even on top of shelving.
The pegboard is an essential piece, and made more of a difference than I thought it would. It has a dual purpose- storage and aesthetic. Now this may seem obvious to other people (I wouldn’t have gotten there by myself, I’m not going to lie), but… the boards are attached to the studs on the wall, and the pegboard is attached to them. This lets them actually be functional!
For the chevron pattern, Handmade Utah (@2crafty4myskirt) has the best tutorial. Really, it’s easiest to tape out overlapping diagonals, and then use a razor to cut out the chevron pattern. I used a roller, and the extra paint from our front door.
I am so thankful storage is ‘in’ these days- it made the finishing touches so much more fun!
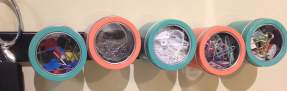
Did y’all see these at Michaels? They had some in their little ‘bargain’ section.
They’re magnetic storage bins- so I have them on the same strip as my good scissors. Pins of various sorts, price tags, paper clips, and binder clips all have their place. I LOVE them! Just as exciting was their tilt out bins, which I have mounted on the side of the table.
Target also had some great bins in their bargain section— Do you see a theme here?
I have one for stamps and sparkly things, one has my punches, and then the other has ribbon.
I could seriously go on about all that I have here for days… and probably will 🙂 I’ll be putting more of a focus on the actual sewing side next time! Thanks for reading 🙂
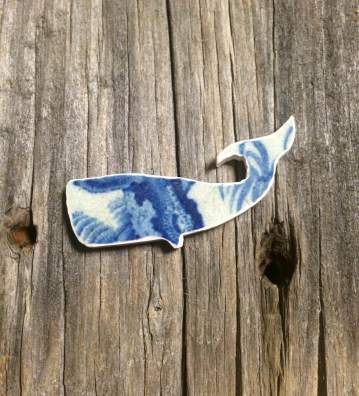
This, my friends, is my new toy. The Taurus 3 Ring Saw from the Gemini Saw Company. Let me tell you, this is a beast. Up to this point, to shape any broken pieces of porcelain, I would use clippers that risked cracking things in half. Now, I can cut out any shape I want! It changes everything. I am going from circles and triangles, to dogs and whales!
Look at my little whale!
I am so excited! Now, I make stencils and trace them out directly on the china with a paint pen. For those of you who don’t know what the ring saw is-it’s a diamond saw blade that can cut in any direction because of its round design. It is also a wet saw which keeps everything cool. These types of saws are made for the stained glass world, but it is quite useful for porcelain. I feel much better cutting things now, and I waste less material by cutting out instead of destroying all the bits around it. This allows me to use the leftover bits of china for jewelry projects like bracelet charms.
I decided to see if I could cut out the shape of a Brittany Spaniel…
It could be my Hank or Sadie!
I give this machine a big thumbs up. It revolutionizes my production abilities. I am going to create a rating system to use now and in the future. Five Hammers =Perfect. One Hammer= Don’t Bother.
So The Taurus 3 Ring Saw is awarded…..(drumroll)…..
Five Hammers out of Five! It is amazing!
Thanks for reading and remember tomorrow is Wednesday. That means it is the first edition of “Wifey Wednesdays.” Alli will be taking the helm and posting tomorrow!
Welcome to the first post of the HandyGent! I have finally decided to start my own blog. What do I have to offer, you may ask? I am a man who creates. I thought folks may enjoy a Craft Blog from a man. Simple as that. The journey I want to take you on involves my various craft projects, home improvement adventures, organization, and tools.
First off, my name is Max. My wife, Alli, is the best and most supportive spouse one could ever hope for. Keep an eye out for her guest posts! I am thinking about calling them “Wifey Wednesdays.”
Our two dogs are our pride and joy! Hank and Sadie are the best Brittany dogs you will ever come across! No bias here! They are the inspiration behind our business name. They also come with us to many of our craft shows. Without them, our lives would be pretty boring. They even have their own instagram account which has more followers than I do. Their Instagram.
In 2013, I moved to Charleston, SC. I was working on renovating historic houses in the downtown area. This is when I seriously became a home improvement geek. I learned as much as I could and was able to overcome the fear of attempting a project I have never even thought about before. I learned how to work on plumbing, electricity, remodeling and many other things. While working , I began to find little broken pieces of porcelain in the ground and under the house. I soon realized that these were little shards of history. The houses I was working on were all over 100 years old and what I was finding was old broken china from past residents which they had discarded into midden pits in the ground. Most of it is pre 1900! And thats when the crafting seriously kicked in.
I started making jewelry out of it all. I was finding so much china. Over the next two years, I expanded from making just necklaces. I now make bracelets, rings, cufflinks, hairpins, and so many other things! My wife and I started calling the business Breton Trading Company. We began selling at local craft shows and continue to do so. I am always working on new ways to use the historic china.
Another thing that came as a result of my work on the old houses is my love of reclaimed wood and materials. I love how the old wood looks when given new life in new ways. I love upcycling!
Beer Flight made from old reclaimed handrail.
I do hope everyone will enjoy following me along my journey. I plan on posting about my crafts, my wood projects, home improvement endeavors, and any other adventure I find myself on. Thanks for reading!


 The stripper I used was Klean Strip Premium Stripper. Folks, this is an outdoor project. One must wear thick chemical gloves, a mask, and eye protection as this will likely burn your skin. The good news is, it works. You slather it on the door, wait 15 minutes, and scrape with a plastic scraper. I had to do this 4 or 5 times, as the door had so many coats of old paint on it. It had Green-> Pink-> Yellow-> Turquoise and finally the wood was underneath.


 er clips all have their place. I LOVE them! Just as exciting was their tilt out bins, which I have mounted on the side of the table.
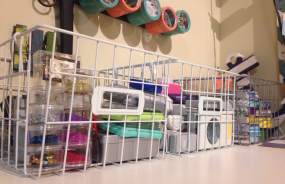


 Hank and Sadie are the best Brittany dogs you will ever come across! No bias here! They are the inspiration behind our business name. They also come with us to many of our craft shows. Without them, our lives would be pretty boring. They even have their own instagram account which has more followers than I do.
  While working , I began to find little broken pieces of porcelain in the ground and under the house. I soon realized that these were little shards of history. The houses I was working on were all over 100 years old and what I was finding was old broken china from past residents which they had discarded into midden pits in the ground. Most of it is pre 1900! And thats when the crafting seriously kicked in.