So I realize I have failed as a blogger over the past two weeks. I let things get away from me and have seriously neglected my vast audience of readers. In the past two weeks I have been crafting and been busy though I promise. For instance, last weekend, we traveled up to Columbia, SC for the USC vs Kentucky basketball game. Let me just say, “GO BIG BLUE!” It was quite a game. But lets get back to business.
The barn door is in! It slides and works. We love it. After sealing the side I stripped the paint off of, I painted the other side trim white. That way from the outside it looks fairly normal.
Outside of room.
Inside door surface.
The track itself went in fairly easily. All of the bolts found their way into a stud except the far right one. I had to replace it with the world’s largest toggle bolt and then paint the head to look black like the rest of the hardware.
We love it and would not have it any other way. We simply do not miss the old builder’s grade double doors that were falling apart.
I promise I will be posting more often. I have jewelry updates, more craft room photos to share, and many posts about things to come. There will be a week in March when we will be in Mexico for a trip, but we will have posts about that when we get back home too. Until then, keep an eye out for more posts on a more regular basis!
I intentionally chose something less complicated than a skirt because… 1) It’s Wednesday and 2) It’s February. I’m not sure if other teachers share this feeling, but February has always been a bit of a doozy for me. In January, I’m still somewhat rested from having 1-2 weeks off, and March brings the promise of spring break. February, though, just has some bad weather. And Valentine’s Day. It’s only the third… oy.
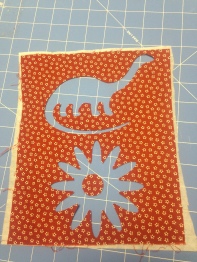
Anyway, this is the test of a new blade for our Silhouette Cameo- one for fabric! I obviously decided to cut out a brontosaurus. The flower is just to take a little more advantage of the space.
Interface is a go
1) If you want to use the Cameo to cut out fabric, it needs interfacing. Silhouette makes its own, but I used leftovers from an old project without any trouble.
2) Make sure you have the adhesive side of the interfacing touching the wrong side of the fabric, and iron the smooth side of the interfacing (glue dots facing the board).
3) Attach the fabric and interfacing to the cutting mat.
4) Make sure you have swapped out the normal blade for the blue fabric one, and line up the mat.
5) Use the fancy cameo program to choose a design. I would go into more detail here, but Max did it for me tonight.
6) Watch it go! It’s more fun than it sounds.
What’s left after the shapes were taken out
Look at them! Aren’t they precious? Now I just have to go find something to put them on…
My latest ongoing home improvement project is replacing the builders grade double doors into the master bedroom with a sliding barn door type setup. The original doors were maddening. They were falling apart, and took up too much floor space when open. They also stuck some when closed which made opening them a loud procedure.
This is the hardware I chose from Amazon. It is affordable and has free shipping, which is great when you think about how much it likely weighs. It will work well with the 36″ opening I am working with.
This post is mainly though about preparing the door itself, and there will be a separate entry about installation. I had a few old heart pine Charleston doors in the garage. I picked one out, and this is to be my sliding door.
Door before any work done next to Pie Safe in bedroom.
I love chippy old lead based paint. The issue is, I already have a focal point piece in the master that has it- my old pie safe. It is one of my most favorite pieces of furniture. I picked it up at a country auction a few years back, and it is gorgeous. The door, though also beautiful, has green and pink chippy paint and it was too much of the look so close together. So the decision to strip it was made.
The stripper I used was Klean Strip Premium Stripper. Folks, this is an outdoor project. One must wear thick chemical gloves, a mask, and eye protection as this will likely burn your skin. The good news is, it works. You slather it on the door, wait 15 minutes, and scrape with a plastic scraper. I had to do this 4 or 5 times, as the door had so many coats of old paint on it. It had Green-> Pink-> Yellow-> Turquoise and finally the wood was underneath.
This is what it looks like as the paint starts bubbling up with the chemical stripper on top.
Here is the progression from coat one to five. The final picture is how I have left it. I didn’t want to take away all of the paint. The step after stripping is to wipe it all down with mineral spirits to remove any traces of the chemical. I also then wiped down the door with tung oil (my favorite reclaimed wood finish).
The wood underneath is beautiful. I can’t wait to show you all how it looks on its track and being used. I have to modify the door frame some, and then paint the other side of the door. I am painting it a solid semi gloss white to match the trim in the house, so that from outside the room, it does’t look out of place. It will be nice once it is all complete, so we can have a bedroom door again rather than the old curtain we are currently using. The Wifey will certainly appreciate it. Thats all for now– Look out for part two of this project!


 The stripper I used was Klean Strip Premium Stripper. Folks, this is an outdoor project. One must wear thick chemical gloves, a mask, and eye protection as this will likely burn your skin. The good news is, it works. You slather it on the door, wait 15 minutes, and scrape with a plastic scraper. I had to do this 4 or 5 times, as the door had so many coats of old paint on it. It had Green-> Pink-> Yellow-> Turquoise and finally the wood was underneath.


